Every time I watch the Battle of Yavin in A New Hope, I can’t help but feel completely satisfied. But there’s always one question that sticks with me—how did Luke manage to make that shot? I mean, this was his first time flying an X-wing. He had zero experience with the starfighter, yet somehow, he pulled off an impossible 90-degree shot and became the hero of the Rebellion.
After wondering about this for so long, I finally found the answer. And honestly, the way everything lined up to make that moment happen just makes Luke’s first X-wing mission even more incredible.
The Rebel Attack Plan

In a tense briefing, Rebel pilots learn about their daunting mission to destroy the first Death Star by targeting a minuscule thermal exhaust port only two meters wide.
General Jan Dodonna, the strategist behind the plan, outlines the challenge:
“The battle station is heavily shielded and carries a firepower greater than half the star fleet.
Its defenses are designed around a direct large-scale assault.
A small one-man fighter should be able to penetrate the outer defense.”
One pilot voices a concern, “Pardon me for asking, sir, but what good are snub fighters going to be against that?”
Dodonna explains, “The Empire doesn’t consider a small one-man fighter to be any threat, or they’d have a tighter defense.
An analysis of the plans provided by Princess Leia has demonstrated a weakness in the battle station.
The approach will not be easy.
You’re required to maneuver straight down this trench and skim the surface to this point.
The target area is only two meters wide.
It’s a small thermal exhaust port right below the main port.
The shaft leads directly to the reactor system.
A precise hit will start a chain reaction which should destroy the station.
Only a precise hit will set up a chain reaction.”
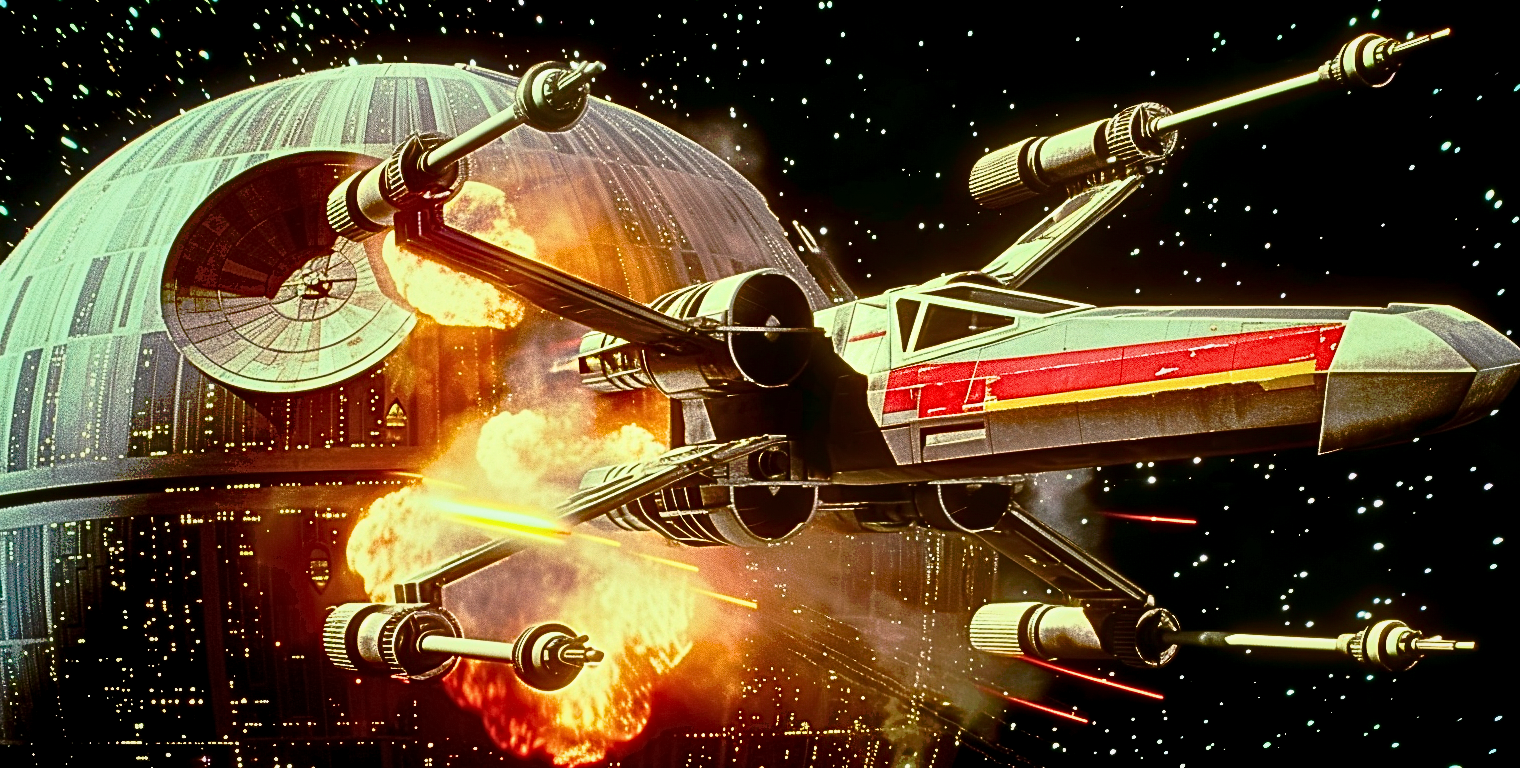
To avoid heavy turret fire, the pilots must fly through a narrow trench on the Death Star’s surface and fire proton torpedoes with perfect timing and precision.
Dodonna concludes with a rallying cry, “Then man your ships, and may the Force be with you.”
How Luke Skywalker Makes the Impossible 90-Degree Turn Shot
Luke Practiced the Shot Before Realizing He’d Need It
As I mentioned earlier, when General Dodonna was explaining the strategy to destroy the Death Star—firing into the exhaust port—Wedge was quick to point out, “That’s impossible, even for a computer.” But then Luke confidently responded, “It’s not impossible. I used to bullseye womp rats in my T-16 back home. They’re not much bigger than two meters.”
From what Luke said, it’s clear he had already been doing something similar to firing into the Death Star’s exhaust port. If you don’t know, the T-16 Skyhopper is a type of airspeeder that Luke used back on Tatooine to take out the womp rats.
That means he wasn’t just some farm boy dreaming about adventure—he had real experience flying at high speeds and hitting small targets on the ground. He had done this countless times before, just in a different setting.
The Force Guided Luke’s Shot
When Luke took that final shot, there’s one crucial element we can’t ignore—the Force.
We know how the Force works for those who can wield it, but when Obi-Wan spoke to Luke through the Force and told him, “Use the Force,” it wasn’t about guiding the shot directly. It was about trusting in the Force, feeling the moment, and taking the shot when it was right.
It’s the same lesson Obi-Wan taught him back on the Millennium Falcon during his first lightsaber training. Back then, Obi-Wan told Luke to let go and allow the Force to guide him. And in that critical moment above the Death Star, Luke finally understood what that truly meant.
After Obi-Wan’s voice echoes, “Let go, Luke,” we see Luke make a bold decision—he turns off his targeting computer. At that point, he’s not relying on the X-wing’s technology or even his own skills. He’s putting his complete faith in the Force, trusting it to guide him to the perfect shot. And in the end, that’s exactly what saved the Rebellion.
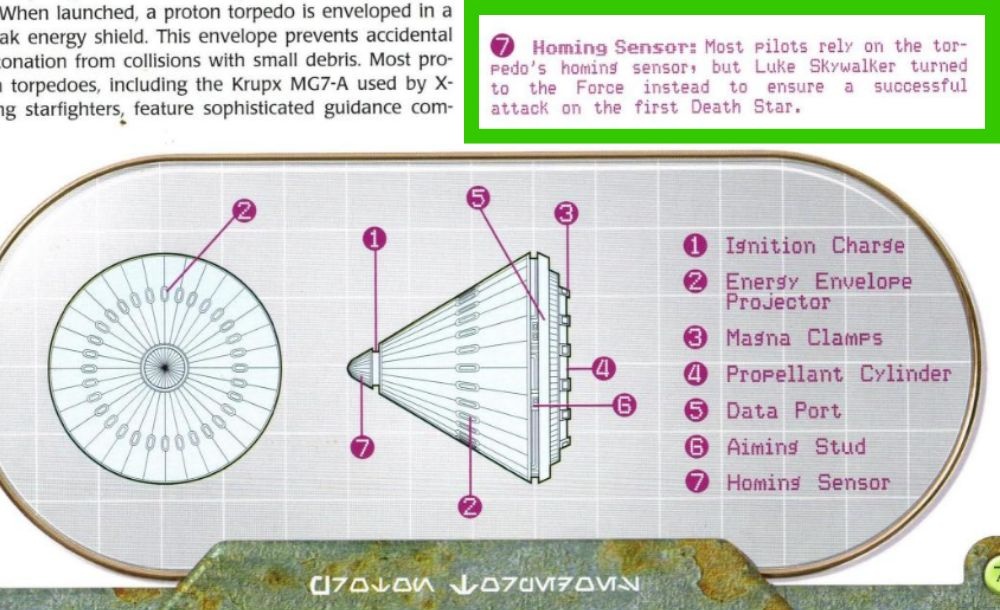
Star Wars: The New Essential Guide to Weapons and Technology explains that proton torpedoes are designed with a homing sensor at the tip, allowing them to lock onto targets with precision. But instead of relying on that technology, Luke put his complete trust in the Force.
The book even states, “Most pilots rely on the torpedo’s homing sensor, but Luke Skywalker turned to the Force instead to ensure a successful attack on the first Death Star.”
Advanced Guidance Systems Aided the Proton Torpedoes
Another theory attributes the successful shot to advanced technology.
The Krupx MG7-A proton torpedoes used by X-wing starfighters come equipped with sophisticated targeting computers capable of adjusting their path after being fired.
Even amid chaotic battle conditions, these torpedoes could potentially make the critical 90-degree turn to reach the exhaust port.
The Star Wars New Essential Guide to Weapons and Technology notes the exceptional accuracy of these torpedoes, which can home in on targets effectively.
The Rebel pilots’ briefing emphasizes that these torpedoes are designed to adjust their trajectory, supporting the idea that advanced guidance systems played a significant role in making the impossible shot possible.
A Nod to History: Inspiration from The Dam Busters
The dramatic scene where Luke destroys the Death Star was inspired by the 1955 film The Dam Busters.

In this World War II movie, pilots had to drop barrel bombs at precise moments so they would skip across water and hit the base of a German dam, much like Luke’s torpedoes had to navigate the trench.
This parallel highlights the connection between the Star Wars scene and the earlier film’s concept.